


Wall Putty on Repaired Plaster Patches: How to Avoid Flashing, Shade Variation, and Surface Rings
Wall finishing problems often become visible only after painting is complete. A wall may look smooth during putty work, but once the paint dries, patch marks start appearing in the form of flashing, uneven shade, or visible surface rings. This is especially common where local plaster repairs have been carried out before repainting or final finishing.
In such cases, the issue is not always the paint. Very often, the problem starts at the substrate level, where repaired patches absorb moisture differently from the surrounding surface. If wall putty is applied without balancing surface texture, suction, and patch profile, the repaired area remains visible even after multiple coats of paint.
For contractors and painters, this is a practical finishing problem. The goal is not just to fill the patch, but to make the repaired zone blend visually and physically with the surrounding wall.
Common Question Asked:
Q.1 Can wall putty hide repaired plaster patches completely?
Yes, wall putty can help conceal repaired plaster patches, but only when the surface is leveled properly, absorbency is balanced, and the correct putty system is used before painting.
Why Repaired Plaster Patches Become Visible After Painting
A repaired patch behaves differently from the original plaster around it. Even when the patch looks flat before painting, it may still differ in porosity, moisture absorption, texture, and curing behavior.
That difference causes problems such as:
- flashing under angled light
- shade variation after painting
- visible patch boundaries
- circular or rectangular surface rings
- uneven gloss or finish holdout
This usually happens when the repaired area has not been properly feathered, sealed, or finished with a compatible putty system.
What Causes Flashing and Shade Variation on Patched Walls
Flashing happens when the repaired patch reflects light differently from the surrounding wall. In most cases, the repaired zone either absorbs more paint or dries with a different texture.
Common causes include:
Uneven Surface Absorbency
Fresh patch repairs often absorb water and paint faster than old plaster, creating tone variation.
Poor Leveling of the Repair Area
If the patch is not feathered out smoothly, the boundary remains visible through the paint film.
Wrong Putty Selection
Using only one finishing layer over a rough or absorbent patch is often not enough.
Inadequate Drying Before Putty Application
If the repaired patch still contains moisture, it can affect adhesion and final surface appearance.
Texture Difference Between Old and New Surface
Even a small difference in grain or smoothness becomes visible after topcoat application.
Why Wall Putty Matters in Patch Repair Finishing
The role of wall putty in repaired areas is not just to fill minor undulations. It helps create a uniform finishing base so that the final paint coat behaves consistently across both repaired and unrepaired surfaces.
A good wall putty system helps by:
- improving level uniformity
- reducing absorbency difference
- smoothing patch transitions
- enhancing paint coverage
- reducing visible patch outlines
But this only works when the correct type of putty is used in the correct sequence.
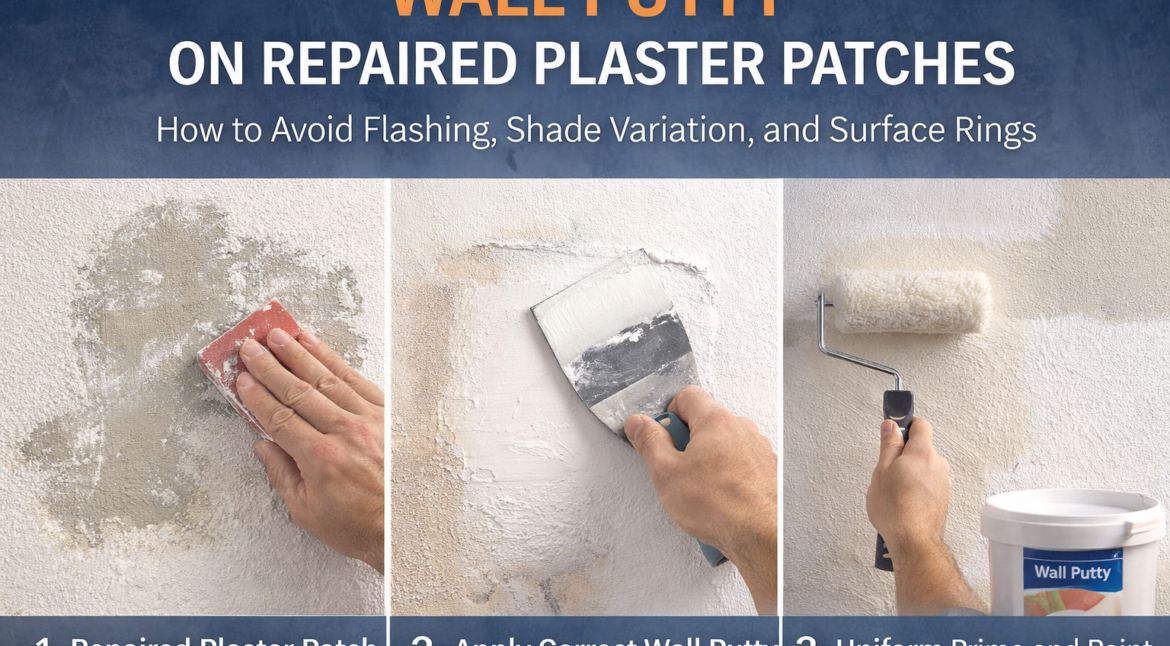
Using Coarse Putty for Patch Level Correction
Where the repaired plaster patch is uneven, rough, or slightly recessed, the first step is often to use course putty to build and level the area properly before final finishing.
A product like Whiteplast RF is suitable where base correction is needed to reduce profile difference between the patch and the surrounding wall. This kind of build-up layer helps eliminate low spots that later show up as rings or shadows after painting.
Coarse putty is especially useful when the patch repair has left a visible edge or trowel mark that cannot be hidden by paint alone.
Fine Putty for Surface Blending and Smooth Finish
Once the patch is leveled, the next step is to refine the surface using fine putty so the repaired zone blends visually with the rest of the wall.
A finishing product such as Whiteplast SF can help achieve a smoother and more uniform surface before primer and paint application. Fine putty is important because even when the patch is level, slight variation in texture can still create visible flashing under natural or side lighting.
This stage is what helps the repaired area disappear into the overall wall finish instead of standing out after painting.
Where Epoxy Putty Fits in Patch Repairs
In some cases, the damaged area is not just a shallow plaster defect. It may involve cracks, chipped edges, or localized surface damage that needs stronger repair before putty finishing begins. In such cases, epoxy putty may be used as a repair-stage material rather than a direct decorative finishing layer.
For example, Epkote EP LV is relevant where strong filling and localized repair are needed before the surface is brought back into line with plaster and putty.
The key is that epoxy putty should not be treated as the final visible layer on the wall. It is used for repair preparation, and then the surface must still be finished correctly with a wall putty system.
How Surface Absorbency Should Be Balanced Before Painting
One major reason repaired areas remain visible is that the patch and surrounding wall absorb primer and paint differently. Even with good putty work, the final finish can still show variation if surface suction is not balanced.
This is where a base treatment such as water-based primer becomes important before topcoat application. A product like Primer WB can help regulate absorbency and improve coating uniformity across patched and unpatched areas.
Where additional coating support is needed, systems such as Upren Great India or Upren Viksit Bharat may be relevant depending on the finishing requirement and wall condition.
This step is often missed, and that is why many patch repairs still show after paint even when putty has been applied.
When Anti-Carbonation Paint Becomes Relevant
In exterior or exposed wall conditions, repaired plaster patches may also be vulnerable to environmental attack, hairline surface cracking, or moisture-related finish deterioration. In such cases, a protective topcoat like anti carbonation paint may be considered as part of the full wall system.
A product such as Mazikcoat can be relevant where added surface protection is needed over properly prepared and finished plaster surfaces.
This is not a substitute for wall putty, but it can improve durability in patch-repaired walls exposed to external stress.
Practical Steps to Avoid Patch Marks After Putty and Paint
To reduce flashing, shade variation, and surface rings on repaired walls, the finishing process should follow a clear sequence.
Let the Repair Dry Fully
Fresh plaster patches must be fully dry before putty application.
Level the Patch Properly
Use a build-up layer where needed so the patch sits flush with the surrounding wall.
Blend Texture, Not Just Thickness
Even if the patch is level, it must also match the surrounding smoothness.
Use Fine Putty for Surface Uniformity
A finishing putty layer is important to create visual consistency before painting.
Prime the Entire Surface Uniformly
Do not prime only the patch. Prime the full area so absorbency remains consistent.
Avoid Over-Sanding the Patch Alone
Uneven sanding can create a halo effect around the repaired zone.
Conclusion
Repaired plaster patches become visible after painting when the wall system is not treated as a complete finishing surface. The patch may be structurally repaired, but unless the texture, absorbency, and level difference are corrected properly, the final paint finish will still reveal flashing, shade variation, or surface rings.
Using the right wall putty system is essential in these situations. A proper sequence involving course putty for leveling, fine putty for finishing, and suitable base preparation before paint can make repaired patches blend far more effectively with the surrounding wall.
Where deeper repairs are involved, epoxy putty may support the restoration stage, and protective topcoats may be considered depending on exposure. But the real key is surface uniformity. When the wall is prepared correctly, patch marks are far less likely to show in the final finish. For more information, Contact Us.
FAQs
-
1. Why do plaster repair patches show after painting?
Repair patches often show because they absorb paint differently or have a different texture than the surrounding wall.
-
2. Can wall putty remove patch marks completely?
Wall putty can help conceal patch marks, but only if the repair is leveled, dried, and finished properly before painting.
-
3. What is the difference between coarse putty and fine putty?
Coarse putty is used for leveling uneven areas, while fine putty is used to create a smooth finishing surface before paint.
-
4. Is primer necessary after wall putty on repaired patches?
Yes. Primer helps balance absorbency and improves uniformity between patched and surrounding areas.
-
5. When is epoxy putty used in wall repair?
Epoxy putty is used for stronger local repair where the substrate is chipped, cracked, or damaged before decorative finishing begins.