


How to Improve Tile Bonding Strength on RCC & AAC Block Surfaces
Introduction
Tile bonding might seem like a straightforward jobmix some adhesive, slap on some tiles, and you’re good to go, right? Not so fast. Anyone who’s dealt with tiles coming loose, cracking, or completely popping off knows that proper tile bonding is a game of precision and science. Whether you’re working on Reinforced Cement Concrete (RCC) or Autoclaved Aerated Concrete (AAC) block surfaces, bonding strength is critical. And when it fails, you’re left with a mess that’s costly, time-consuming, and frustrating to fix.
In this guide, we’re diving deep into the art and science of improving tile bonding strength on RCC and AAC block surfaces. We’ll decode why tiles often fail, the role of high-quality adhesives, and introduce top-tier solutions like Redwop’s range of tile adhesives and ADMIX EXTRA BOND. Our goal? Helping you ensure every tile sticks—literally and figuratively.
Let’s get into it.
Understanding RCC and AAC Block Surfaces
Before getting your hands dirty with tile adhesive, it’s crucial to understand what you’re working with. RCC and AAC blocks are two popular construction materials, but they come with different bonding characteristics.
RCC Surfaces: These are strong and durable, but they often have a smooth finish that makes tile adhesion a bit tricky. The concrete’s natural porosity also plays a role in how adhesives behave.
AAC Blocks: These are lightweight and have better thermal insulation, but their highly porous nature means they absorb more adhesive. That sounds good in theory, but without proper preparation, this can actually reduce bond strength.
Here’s the thing: no matter how advanced your tile adhesive is, if your surface prep doesn’t consider the unique properties of RCC or AAC blocks, you’re setting yourself up for failure. And that’s where Redwop’s products shine—they’re designed to bond in the toughest conditions.
Common Reasons for Tile Debonding
Tiles popping off isn’t just a matter of bad luck; it usually stems from one or more preventable mistakes. Based on real-life scenarios and insights from Redwop’s product sheet, here are the top reasons your tiles might not be sticking around:
Impact of Saline Surfaces
Using adhesive on a surface contaminated with salts (saline surfaces) is one of the biggest culprits. Salts can react with the adhesive, weakening the bond over time. This is especially problematic in coastal regions or where groundwater has high salt content.
Fix: Always clean the surface thoroughly before applying any adhesive. If you’re working on RCC or AAC that’s exposed to saline moisture, neutralize the salts using a proper primer or bonding agent.
The Role of Tile Spacing
Here’s a commonly ignored step: spacing between tiles. It may seem minor, but it’s crucial. Tiles expand and contract due to temperature changes. Without a gap, this movement leads to cracking or complete debonding.
Fix: Always leave a minimum gap between tiles, especially for outdoor areas. Use spacers to keep alignment and ensure consistent expansion space.
Misuse of Cement and Sand Mixes
Old habits die hard—many masons still mix cement and sand into adhesives, thinking it makes them stronger. In reality, it can ruin the formulation. It alters the chemical structure, reducing bonding power and flexibility.
Fix: Stick to the manufacturer’s instructions. Redwop tile adhesives come pre-formulated with the perfect mix. There’s no need to add anything, especially not cement or sand.
Workmanship and Application Errors
Poor workmanship is the silent killer of tile bonding. Not using a steel trowel, skipping back-buttering on large tiles, or uneven adhesive application can all result in weak bonds. It’s not just about the product—it’s about how you apply it.
Fix: Use a steel trowel on both the tile back and the wall surface. Apply adhesive evenly and ensure full coverage. Back-buttering is a must for large-format tiles to avoid hollow spots.
External Force Impact
Sometimes, it’s not what you do during installation but what happens afterward. A sudden jerk, impact, or even consistent vibrations can stress the adhesive layer. If the bond strength isn’t adequate, tiles won’t survive.
Fix: Use adhesives with higher flexibility and bonding strength, like Redwop’s PROLIX EXTRA and ADMIX EXTRA BOND. These are specially formulated to absorb shocks and vibrations better than standard adhesives.
Summary of Common Debonding Reasons:
Cause | Effect | Solution |
Saline Surface | Adhesive breakdown | Clean surface, use bonding agents |
No Tile Gaps | Cracking, debonding | Always leave space for expansion |
Extra Cement/Sand Added | Weakens the adhesive mix | Use as directed, no extra ingredients |
Poor Application Technique | Incomplete bond coverage | Use a steel trowel, apply adhesive on both sides |
External Shock/Impact | Breaks the adhesive bond | Use flexible adhesives with extra strength |
Surface Preparation Techniques
Let’s be real, tile adhesive is only as good as the surface it’s sticking to. And when it comes to RCC and AAC block walls, surface prep is not optional, it’s absolutely critical. Skipping this step is like trying to paint over a dusty wall, it’s just not going to last.
Cleaning Techniques for Cement Plaster and Red Brick
Start with the basics. Clean the wall thoroughly. You’re looking to remove dust, oil, grease, loose particles, or any existing coatings that could interfere with adhesion. If you’re working with RCC surfaces, ensure all form oil, curing compounds, and laitance are scrubbed off completely. Use a stiff brush or high-pressure water jet if needed.
For AAC blocks, their porous nature means they absorb moisture and any contaminants even more easily. Pre-wet the surface slightly, don’t drench it, just enough so the surface is damp, not soaking. This prevents the adhesive from drying too quickly upon application.
Pro Tip: Avoid applying tiles on a saline surface at all costs. This is one of the leading causes of adhesive failure. If you suspect salt presence, consider using a salt-neutralizing primer.
Priming and Using Steel Trowels Correctly
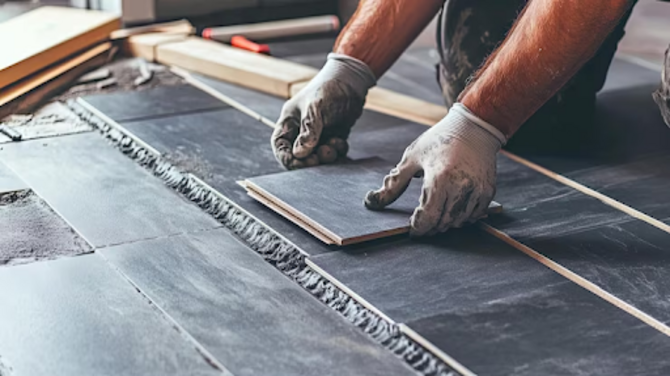
Here’s something most people overlook—using a steel trowel isn’t just about ease of application. It actually helps create uniform ridges of adhesive, ensuring better contact between tile and surface. Apply adhesive on both the wall and tile back for maximum grip—this technique is called double spreading or back-buttering.
This is especially important for large-format tiles and outdoor applications, where temperature and load variations demand stronger adhesion.
Key Steps:
- Prime the surface if needed using an approved primer or bonding agent.
- Use a notched steel trowel to spread the adhesive evenly.
- Apply on both surfaces—don’t skip back-buttering.
- Press tile firmly and twist slightly to bed into adhesive.
Best Tile Adhesive Practices for Stronger Bonding
Let’s get into the real game-changer—tile adhesives. With the wide variety of tile types and sizes available today, a one-size-fits-all approach doesn’t work. That’s why choosing the right adhesive is critical, and Redwop delivers some of the best options in the market.
Choosing the Right Adhesive Based on Tile Size
Larger tiles mean more weight and more surface area in contact with the adhesive. That equals more stress on the bond. You need a specialized adhesive that can handle the load without breaking a sweat.
Redwop Recommendations:
- 2”x2” Vitrified Tiles – Use TeraTile Silver, GP, or Gold
- 2”x4” and 4”x4” Tiles – Use TeraTile Gold, MP, or SINEX
- 4”x6” Tiles – Go with TeraTile Diamond or Platinum
- 6”x8” and larger (10”x10” and above) – Best results with PROLIX and PROLIX EXTRA
These products are specifically formulated to provide superior bond strength, flexibility, and water resistance—everything your tiles need to stay stuck.
Mixing and Application Techniques
Mixing adhesive might seem simple, but a slight error can affect bond performance. Always mix Redwop tile adhesives in clean, potable water using a mechanical stirrer. Avoid hand-mixing—it can leave clumps that weaken adhesion.
Apply adhesive within its pot life. If it starts to harden in the bucket, don’t add water—just discard and mix a fresh batch. Apply uniformly using the notched trowel and avoid leaving air pockets under tiles.
Role of Tile Spacing in Expansion and Contraction
This is one of those things that feels unnecessary—until it isn’t. Skipping tile spacing can ruin an entire job. Why? Because tiles expand and contract based on ambient temperature and moisture. Without space, there’s no room for movement, and that pressure gets transferred straight to the adhesive bond.
Result? Cracks, popped tiles, and eventual failure.
Technical Justification for Tile Gaps
Every tile, no matter how perfect it seems, behaves like a living, breathing material. As it heats and cools, it expands and contracts. Add to this environmental factors like rain, sun, or cold, and your tiles are constantly under stress. Without spacing, they push against each other, and since there’s no give, they crack or lift.
Recommended spacing:
- Indoors: 2–3 mm
- Outdoors: 3–5 mm or more, depending on tile size and weather conditions
Use spacers to maintain uniformity and make grouting easier. Choose high-quality grout that allows slight flexibility and waterproofing.
Combine this with Redwop’s strong adhesives, and you’ve got a bond that lasts for decades, not just years.
Recommended Tile Adhesive Products by Redwop
Choosing the right tile adhesive isn’t just about brand loyalty—it’s about matching the right formulation with the right tile, substrate, and use case. And when it comes to superior bonding on RCC and AAC surfaces, Redwop products stand out for their reliability, strength, and ease of use.
Whether you’re dealing with small vitrified tiles or large format porcelain slabs, Redwop offers a diverse lineup of tile adhesives under its TeraTile series, each designed for specific dimensions and conditions. Here’s how to choose wisely.
TeraTile Product Guide Based on Tile Size
Let’s break it down so you can choose the exact adhesive for your job:
Tile Size | Recommended Redwop Product |
2”x2” | |
2”x4” | |
4”x4” | |
4”x6” | |
6”x8” and 4”x8” | |
10”x10” and above |
Each of these products has its own advantages. The Silver and GP grades are excellent for small-format tiles and indoor applications. Gold, MP, and SINEX offer enhanced strength and flexibility, suitable for medium-format tiles.
As you go larger, you want more robustness. That’s where Diamond, Platinum, PROLIX, and PROLIX EXTRA come into play. These adhesives are built for heavy-duty, high-stress environments like outdoor patios, commercial lobbies, and even industrial walls.
Why Choose PROLIX and PROLIX EXTRA for Larger Tiles
Large tiles are trendy, but they come with their own set of challenges. They require more precise leveling, thicker adhesive beds, and, most importantly, superior bonding. Enter PROLIX and PROLIX EXTRA from Redwop.
PROLIX offers enhanced polymer strength, ensuring long-term adhesion even under stress. PROLIX EXTRA goes a step further, delivering unmatched flexibility and strength—ideal for areas exposed to temperature shifts or load-bearing pressure.
Use PROLIX EXTRA when:
- Tiling over RCC or AAC blocks in outdoor settings
- Installing tiles larger than 10”x10”
- Working on high-traffic areas like malls or hallways
- You want peace of mind for 10+ years
Power of ADMIX EXTRA BOND by Redwop
If you’re aiming for maximum bonding performance, one name should be on your radar: ADMIX EXTRA BOND. This game-changing additive transforms any tile adhesive into a high-performance solution.
What is it?
ADMIX EXTRA BOND is a polymer-based additive developed by Redwop to significantly increase tile adhesive bonding strength. It improves flexibility, enhances water resistance, and prevents premature debonding.
When and How to Use ADMIX EXTRA BOND
Use this when tiling over challenging surfaces—like RCC and AAC—or when installing tiles in high-moisture or high-vibration areas. Mix it with your chosen Redwop adhesive instead of water, and it boosts the adhesive’s mechanical properties tenfold.
Use Cases:
- Outdoor tiling is exposed to rain and heat
- RCC slabs where expansion/contraction is expected
- Wet areas like bathrooms, balconies, and terraces
- Industrial and heavy-load environments
Mixing Ratio: As specified on the product label, always follow the manufacturer instructions.
Why it matters: ADMIX EXTRA BOND reduces the chances of tile failure even when external stress, moisture, and thermal variations are at play. Combined with the right adhesive, it’s a one-two punch of unbeatable performance.
Expert Tips from Redwop for Optimal Results
Redwop doesn’t just make adhesives—they’re experts in helping you use them right. Here are some field-tested tips straight from the professionals at Redwop:
- Always clean the surface thoroughly before applying adhesive, especially RCC and AAC block surfaces prone to dust and salt.
- Use a steel trowel for both surfaces—tile back and wall—for even spreading.
- Never add extra cement or sand to adhesive mixes. It weakens the formula.
- Mix adhesives mechanically, not manually. This ensures uniform consistency.
- Double spreading (back-buttering) is essential for large tiles.
- Use tile spacers—never skip them, especially outdoors.
- Don’t reuse dried adhesive—mix a fresh batch instead.
- Use ADMIX EXTRA BOND for extra bonding in tough environments.
Pro-Level Advice: Temperature and humidity play a big role in adhesive curing time. Avoid tiling during extreme weather, and protect newly installed tiles from direct sun or rain for at least 24–48 hours.
Case Studies and Real-Life Applications
Seeing is believing, right? Redwop adhesives have been used in countless residential, commercial, and industrial projects across India. Here’s a quick look at some real-world success stories:
Case Study 1: Residential RCC Terrace in Gujarat
Problem: Tiles frequently debonding due to sun and rain exposure
Solution: TeraTile PROLIX + ADMIX EXTRA BOND
Result: No tile failures reported even after 3 monsoons. Perfect adhesion and no cracks.
Case Study 2: AAC Block Wall Tiling in High-Rise Apartments
Problem: Hollow sounds and popping tiles
Solution: TeraTile MP with proper surface cleaning and back-buttering
Result: Uniform bonding, improved acoustic control, and no customer complaints.
Long-Term Maintenance Tips
Once your tiles are properly installed with Redwop adhesives, keeping them intact is all about maintenance. Even the strongest adhesive needs care to ensure longevity.
- Grout regularly: Inspect and replace cracked or missing grout to avoid water seeping under tiles.
- Avoid harsh cleaners: Use pH-neutral cleaning agents to avoid corroding adhesives.
- Seal joints and tile edges—especially in wet areas.
- Check for movement or hollow sounds periodically, and address early signs before they become big problems.
- Use protective coatings for exterior tiles to protect against UV and rain damage.
With the right products and good maintenance, your tile job will look as fresh years later as the day it was installed.
Conclusion
If there’s one takeaway from this guide, it’s this: tile bonding isn’t just about sticking tiles; it’s about doing it right. Whether you’re working with rugged RCC or absorbent AAC blocks, ensuring strong tile adhesion comes down to preparation, precision, and product choice.
We’ve explored why tile bonding fails—from saline surfaces and poor workmanship to incorrect adhesives—and how to fix it. You’ve learned the importance of proper spacing, the role of tools like steel trowels, and why cutting corners only leads to long-term regret.
But most importantly, we’ve spotlighted Redwop’s powerful lineup of tile adhesive products—from the versatile TeraTile series to the high-performance PROLIX and PROLIX EXTRA, and of course, the revolutionary ADMIX EXTRA BOND. These are more than just products—they’re solutions, built to stand up to India’s toughest climates, heaviest tiles, and most demanding conditions.
So the next time you’re getting ready to lay tiles—whether in a kitchen, terrace, lobby, or high-rise façade—remember: Do it once, and do it right—with Redwop.
FAQs
-
Q1. What is the best adhesive for large-format tiles on RCC surfaces?
For large format tiles (10"x10" and above) on RCC, Redwop recommends PROLIX or PROLIX EXTRA. They offer superior bond strength and flexibility, ideal for handling expansion, contraction, and heavy foot traffic.
-
Q2. Can I use Redwop tile adhesives on AAC block walls?
Absolutely. Redwop products like TeraTile MP, SINEX, and Gold are designed for AAC surfaces. Just make sure to clean the surface thoroughly and slightly dampen before application.
-
Q3. What’s the role of ADMIX EXTRA BOND in tile fixing?
ADMIX EXTRA BOND is a polymer additive that enhances the bonding strength of tile adhesives. It provides better water resistance, flexibility, and is ideal for high-stress or outdoor environments.
-
Q4. Why is tile spacing important in tiling work?
Tile spacing allows for expansion and contraction due to temperature changes. Without adequate spacing, tiles can crack, lift, or debond over time. Use spacers to ensure uniform gaps.
-
Q5. Can I add cement or sand to Redwop adhesives to make them stronger?
No, never. Adding cement or sand disrupts the formulation and weakens the bond. Redwop adhesives are pre-mixed for optimal performance. Always use them as directed.